
PURPOSE
This SOP describes procedure for the operation and calibration of top balance.
SCOPE
This SOP pertains to the handling of top balance in quality control laboratory.
RESPONSIBILITIES & AUTHORITIES
- It is the responsibility of quality control analyst to follow this SOP for Calibration and Operation of Top Balance as written.
- It is the responsibility of QC manager to make certain that this SOP for Calibration and Operation of Top Balance is followed in its entirety and to review and update this SOP as necessary.
REFERENCE & REQUIREMENTS
Code of Federal Regulations, July 1, 1990.40 CFR part 160 Good Laboratory Practice Standards.
DEFINITION & ABBREVIATIONS
Calibration: Calibration means the set of operations that establish under specific conditions the relationship between values indicated by an instrument or measuring system for especially weighing, recording and controlling or the values represented by a material measure and the corresponding known values of a reference standard and the limits for acceptance of the results of measuring.
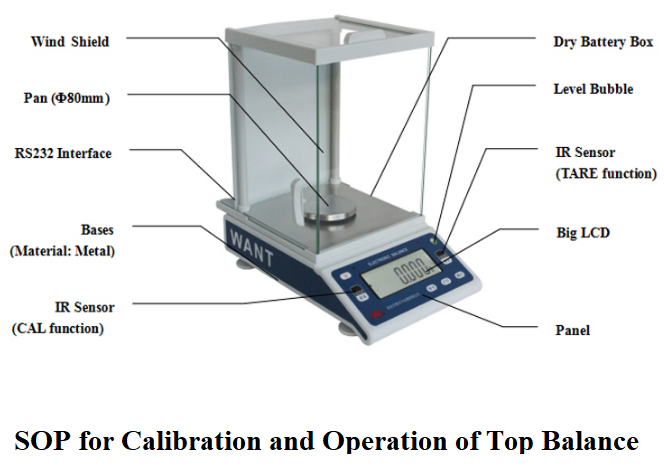
PROCEDURE
| Sr. No. | Name of the Machine / Equipment | Manufacturer | ID NO. |
| 01 | Top Balance | METTLER TOLEDO | QCMI-009 |
Materials And Equipment’s
- Standard Weights
- Top balance
- Printer, Sartorius or equivalent
- Butter paper/beaker
- Weighing Tongs
- Balance pan brush
- Printer paper (if applicable)
Safety Consideration
- Wear lab coat, gloves and safety glasses at all time during testing.
- Review last completed Balance Calibration form.
- Perform daily calibration check within 24 hours proceed with the standard weight.
If the daily calibration check has not performed within 24 hours then ensure that
- The top balance has not exceeded calibration due date by checking the balance’s calibration sticker.
- The calibration is performed after six months by outside sources and is a separate test from the daily calibration check performed by QC analyst.
- If the calibration due date has been exceeded, contact QC manager. Paste label “Do not Use, Out of Service, Maintenance required” to the balance that it is Out of Service until the calibration has been performed.
- If the calibration due date has not been exceeded, record this date on the appropriate balance Calibration form.
Ensure that the weight set has not exceeded its calibration due date
- If the calibration due date has been exceeded, notify QC manager. Do not use the set until the set is calibrated.
- If the calibration due date has not been exceeded, record this date on the appropriate Balance calibration form and then perform calibration.
Calibration
- Switch ON the analytical balance.
- Press I / soft key
- Attach printer with the balance.
- Close the window of the balance and wait for stable reading.
- Press the TARE soft key.
- Print the tare weight.
- Verify that the printout matches the reading on the balance display.
- Press CAL soft key, LCD screen will display “C” word.
- After one second “C” disappears, balance calibrates automatically and 0.0000 g is displayed on screen.
- Place 1.0000 g, 2.0000 g and 5.0000, 10.0000g and 50.0000g standard weights on the balance pan respectively.
- Wait for stable readings
- Once the balance reading has stabilized, print the reading and verify that the reading matches the reading on the balance display.
- Print out the reading of standard weights.
- If the % age value falls within the range, mark Y in the COMPLIANCE Y/N column
- If the % age value falls outside the range, mark N in the COMPLIANCE Y/N column
- Remove the weights from the balance and place back into the box
- After daily calibration check, attach all printout to the space provided on the Balance Calibration form.
- On the balance calibration printout, record the date and time that the daily calibration checks was performed, along with the signature. The daily calibration check will expire 24 hours after the time printed.
- Present the completed Balance Calibration form to the authorized person for the review and signature.
- If all the readings are within the allowed range for the weights used, the balance is now calibrated for 24 hours, proceed with the weigh procedure.
- If the first performance of the daily calibration check fails, repeat the entire calibration check procedure.
- If the second performance passes, the balance is now calibrated for 24hours proceed with the weigh procedure.
- Construction of form notebook QA print 50 copies of form and bind into a logbook
- QA department must assign the notebook a unique number and sign it out to a QC analyst.
- When the logbook is completed or balance is no longer used, the logbook must be return to QA department for storage in a secure location Perform off center error check on monthly basis.
- Use 1.0000gm, 2.0000gm and 5.000gm standard weights
- First place standard weight in the center of the balance pan
- Wait for stable reading
- Press print soft key for printout.
- Now place standard weight at right, left, front and back edge of the balance pan respectively.
- Calculate the mean of all readings.
- Calculate the percentage difference which must NMT 0.1%.
- Construction of form logbook (Use along with form).
- QA print 50 copies of form and bind into a logbook.
- QA department must assign the notebook a unique number and sign it out to a QC analyst.
- When the logbook is completed or balance is no longer used, the logbook must be return to QA department for storage in a secure location.
Operation
- Switch ON the analytical balance.
- Press I / soft key
- Attach printer with analytical balance.
- Place weighing paper or beaker on the balance pan.
- Close the windows of the balance.
- Press the TARE soft key.
- Wait for the balance reading to stabilize.
- Print the tare weight.
- Open the window and pour the material on weighting paper/in beaker.
- Close the window and wait for stable reading on LCD.
- Print out the weight of the material.
- Place the weighing paper again on the balance and weight for stable reading.
- Verify that the printout matches the reading on the balance display.
- Attach this printout in reagent preparation log book and product specified log book and use net weight.
DOCUMENTS / RECORDS
- Calibration of Analytical Balance Sartorius.
- Log book of operation of balance.
- Off center error check of Analytical Balance Sartorius.